Product SiteDocumentation Site

3.7. Multiple calendars in WebApp

WebApp offers the ability to open multiple calendars in a single overview. The calendars can be opened side-by-side or in an overlay to see the calendars transparent stacked on each other (see Figure 3.23, “Multi User Layover Calendar”). By default the calendars are opened side-by-side.
Select the other calendars you wish to open in the calendar list on the left or open one from another user using the "Open shared calendar" button. By using the arrow keys on top of the calendars, the calendars can be placed in the stacked overlay.
Multi User Calendar
Figure 3.23. Multi User Layover Calendar

3.7.1. Create or delete an appointment in WebApp

To create an appointment simply double click on the time of the user an appointment has to be created for. This will open a new appointment window where the appointment can be created.
To delete an appointment: double click on the appointment to open it, then use the red cross in the toolbar of the appointment dialog to delete it. The item can also be delete by using the delete button from the context menu on the item.

3.7.2. Moving appointments in WebApp

Moving an appointment can be achieved by opening the appointment and changing the start time. In practise most users will prefer moving appointments by using drag-and-drop. To drag an appointment the user clicks and hold down the left mouse button on an appointment and moves (drags) the mouse over the time line to the desired location, to release the mouse button at that point. To help place the appointment a red overlay (see: Figure 3.24, “Dragging appointments”) follows the mouse to indicate new place of the appointment when the mouse is released at that point.
Dragging appointments
Figure 3.24. Dragging appointments

It is also possible to drag an appointment to the store of another user (provided enough permissions are granted). Simply move the mouse to another user’s row and the red overlay will follow.

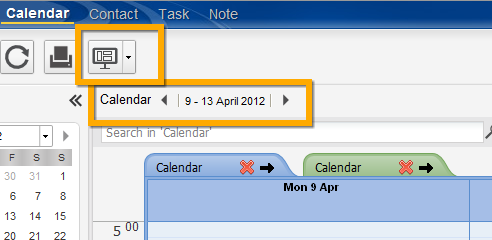
3.7.3. Changing number of displayed days in WebApp

The number of days that are loaded in the time line and the number of days that are visible at the same time (zoom level) can be set from the settings dialog: on the Calendar tab in the settings section. These settings will be used whenever the Multi User Layover Calendar is opened.

3.7.4. Browse time period in WebApp

The Previous Period and Next Period buttons on the tool bar at the top of the page (see: Figure 3.25, “Buttons for changing time period”) are used to view the next of the previous time line period. The Previous Day and Next Day buttons merely move the time line by a single day.
Buttons for changing time period
Figure 3.25. Buttons for changing time period